
Tile efficiency
Reach ready first — with a yaku attached
Give two-sided waits a close look
BEGINNERA ryanmen such as 4–5 can complete on 3 or 6, for up to eight copies. A closed 4–6 wait or an edge 1–2 wait has up to four. Count the visible copies before comparing them, and consider whether changing the wait changes your yaku or hand value.
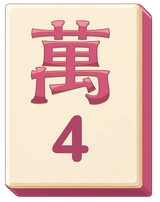
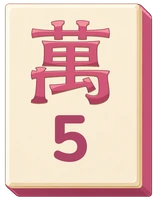
Waits 3m/6m — 8 tiles.

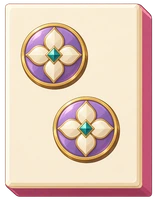
Waits 3p only — 4 tiles.
Consider releasing isolated honours early
BEGINNERHonours cannot form sequences, so an isolated honour may contribute less to an ordinary hand than connected suit tiles. Before discarding it, consider whether it has value as your seat wind, round wind or a dragon, and whether your hand is aiming for an honour-based pattern.
Have a yaku plan by the sixth discard
BEGINNERA complete hand with no yaku cannot win. The everyday toolkit: riichi (stay closed and ready), tanyao (nothing but 2–8), yakuhai (a pong of dragons or your winds). If none of the three is visible in your hand's future by turn six, reshape until one is.
Value vs speed
The declaration, the call, and what each one costs
Declare riichi with a closed ready hand — the default is yes
INTERMEDIATERiichi adds a han, unlocks ura-dora, and forces three players to respect your discard pile. Stay quiet (damaten) only when you already hold a yaku AND the table is dangerous enough that keeping the option to fold outweighs the value. The literature is blunt: declaring is right far more often than beginners believe.
Call pon/chi only when the call buys something you can name
INTERMEDIATEOpening the hand forfeits riichi, menzen tsumo and ura-dora — the most valuable package in the game. Sound reasons to pay it: completing a yakuhai pong, a fast cheap tanyao to end a dangerous round, a half-flush with real value. "It advances my hand" is not on the list.
Count dora before you take a risk
INTERMEDIATEDora never legalise a hand, but they decide whether a risk is priced right. Two dora in hand can justify pushing a dangerous tile; zero dora pushing into a riichi is paying premium prices for a discount hand.
Defensive play
Deal-ins decide placements — folding is a skill, not a surrender
Against riichi, weigh progress against risk
INTERMEDIATEIf your hand is far from ready, another player’s riichi is a reason to reconsider pushing. The declarer’s own discarded tiles are safe against their ron because of furiten; that does not make them safe against the other players. Suji and visible-copy counts offer partial information, not the same protection. Weigh your progress, hand value and available discards.
Fold ready hands when the price is wrong
ADVANCEDBeing ready is not a reason to push — it is one input. Cheap hand, bad wait, live riichi against you: fold it. Strong players routinely abandon tenpai; the habit of pushing BECAUSE you are ready is the most expensive reflex in the game.
Count your wait's real tiles before trusting it
ADVANCEDAt ready, count the wait's remaining live copies — subtract every one visible in discards and melds. A "good" ryanmen with five of its eight tiles gone is worse than a tanki on a live honor. Upgrade the wait when a draw offers more real outs.
Reading the table
The river never lies
Look for a pattern in early middle discards
INTERMEDIATEEarly middle-tile discards can suggest a hand that favours terminals or honours, but they can also come from an already useful shape. Compare later discards and calls before committing to that reading.
Play the placement, not just the hand
ADVANCEDThe same tiles want different plays at different scores. Guarding a lead in South: cheap, fast, fold-ready. Chasing from fourth: value targets and calculated pushes. Before each hand, know what a win, a draw and a deal-in each do to your placement — then build the hand the standings ask for.
Advice and evidence
A strategic suggestion depends on your hand, opponents and scoring sheet. Older simulation summaries do not establish an optimal action. Our latest matched-deal batch reports uncertainty and includes inconclusive results.
Compare strategy across rulesets →
The same shape can lead to a different decision under a different scoring system.